

Abstract
Being a sofware engineer working with different projects made with different technologies, I often found myself in need of switching between multiple versions of the same build tool or applying different configurations. Rather than provisioning my computer with different versions and different configurations, I found it handy to rely on Docker containers, which can be used to build and run local projects. That’s particulary true for cases like Jekyll websites built on a Mac. Apple already provides a Ruby version which is not ready to build Jekyll projects, and if you add the fact that sometimes you can’t run commands as root user, here is when a Docker container can save your day. The basic approach consists in providing your project with a script to be sourced, which configures the shell with the proper environemnt variables and aliases to override default build tools with the ones provided the the Docker image.
What is Jekyll
Jekyll is one of many static website generators. There are cases in which you can’t or don’t want to use server-side solutions to run a website and you prefer a static set of webpages. Jekyll adds “dynamicity” to your static website by rendering HTML and Markdown files while adding them pre-defined templates. Jekyll is written in Ruby, and it needs a properly configured Ruby environment to run.
How to build and run a Jekyll website with Docker
Rather than configuring your machine with proper Ruby and Ruby gems versions, the idea is to use to official Ruby image, and define shell aliases which hide existing binaries and use the one contained in the Docker container.
See the following example to understand how I “override” the existing Ruby executable in my Mac machine with the one provided by the official Ruby Docker image:
1
2
3
4
5
6
7
8
9
10
11
12
13
❯ which ruby
/usr/bin/ruby

❯ ruby -v
ruby 2.6.10p210 (2022-04-12 revision 67958) [universal.x86_64-darwin22]

❯ alias ruby='docker run -it ruby:3.2.2 ruby'

❯ which ruby
ruby: aliased to docker run -it ruby:3.2.2 ruby

❯ ruby -v
ruby 3.2.2 (2023-03-30 revision e51014f9c0) [x86_64-linux]
As you can see, my Mac already has a Ruby executable in /usr/bin/ruby, which provides the version 2.6.10p210 of the interpreter. But after I defined an alias with the very same name and used it to run the ruby executable provided with the Docker image, the reported version has changed to 3.2.2.
Great, so let’s create our dev-setup.sh script with the ruby alias along with all the other commands we need to work on a Jekyll website.
1
2
3
4
5
6
7
8
9
10
11
12
13
14
15
16
❯ ls -l1
Gemfile
Gemfile.lock
LICENSE
_config.yml
dev-setup.sh
src

❯ cat dev-setup.sh
alias ruby='docker run -it ruby:3.2.2 ruby'
alias gem='docker run -it ruby:3.2.2 gem'
alias bundle='docker run -it ruby:3.2.2 bundle'
alias jekyll='docker run -it ruby:3.2.2 jekyll'

❯ source dev-setup.sh
But what happens if we build our Jekyll website?
1
2
3
> jekyll build
docker: Error response from daemon: failed to create task for container: failed to create shim task: OCI runtime create failed: runc create failed: unable to start container process: exec: "jekyll": executable file not found in $PATH: unknown.
ERRO[0000] error waiting for container:
Right, the base Ruby Docker image does not contain the Jekyll dependency that is defined in the project’s Gemfile, we need to run bundle.
1
2
> bundle
Could not locate Gemfile
Still no luck, what’s happening? The answer is very simple actually: the Docker container has no visibility on project files, hence we need to mount the project directory (which is the current working path) as a Docker volume. Since the aliases are getting quire long, let me also refactor the script for better understanting.
1
2
3
4
5
6
7
8
9
10
11
12
13
14
15
16
17
18
>cat dev-setup.sh

RUBY_DOCKER_IMAGE='ruby:3.2.2'

function ruby-on-docker() {
  echo "Ruby Docker Wrapper"

  container_command="$@"
  docker run -it \
      -v ${PWD}:/app \
      $RUBY_DOCKER_IMAGE \
      bash -c "cd /app; $container_command"
}

alias ruby="ruby-on-docker ruby"
alias gem="ruby-on-docker gem"
alias bundle="ruby-on-docker bundle"
alias jekyll="ruby-on-docker jekyll"
Now, we need to source dev-setup.sh again and it’ll work:
1
2
3
4
5
6
7
8
9
10
11
12
13
14
15
16
17
18
19
20
❯ source dev-setup.sh

❯ bundle
Ruby Docker Wrapper
Fetching gem metadata from https://rubygems.org/.........
Fetching concurrent-ruby 1.2.2
Fetching minitest 5.18.1
Installing minitest 5.18.1
Installing concurrent-ruby 1.2.2
...
Installing jekyll-sitemap 1.4.0
Bundle complete! 5 Gemfile dependencies, 40 gems now installed.
Use `bundle info [gemname]` to see where a bundled gem is installed.
Post-install message from html-pipeline:
-------------------------------------------------
Thank you for installing html-pipeline!
You must bundle Filter gem dependencies.
See html-pipeline README.md for more details.
https://github.com/jch/html-pipeline#dependencies
-------------------------------------------------
Now that all the project dependencies have been downloaded, we are able to run jekyll to build the side, aren’t we?
1
2
3
> jekyll build
docker: Error response from daemon: failed to create task for container: failed to create shim task: OCI runtime create failed: runc create failed: unable to start container process: exec: "jekyll": executable file not found in $PATH: unknown.
ERRO[0000] error waiting for container:
The same error again! And, again, we need a Docker volume! Ruby gems are not downloaded in the project directory (as it happens for NodeJs projects). They’re collected into a system folder, ready to be shared with other builds and other projects (as it happens with Maven projects). Let’s modify dev-setup.sh.
1
2
3
4
5
6
7
8
9
10
11
12
13
14
15
16
17
RUBY_DOCKER_IMAGE='ruby:3.2.2'

function ruby-on-docker() {
  echo "Ruby Docker Wrapper"

  container_command="$@"
  docker run -it \
      -v ${PWD}:/app \
      -v ruby-gems:/usr/local/bundle \
      $RUBY_DOCKER_IMAGE \
      bash -c "cd /app; $container_command"
}

alias ruby="ruby-on-docker ruby"
alias gem="ruby-on-docker gem"
alias bundle="ruby-on-docker bundle"
alias jekyll="ruby-on-docker jekyll"
In this case, we don’t need to map Docker volume to any host directory, we can just give in a name for convenience, in this case “ruby-bundle”.
At this point, we can finally run bundle once again to collect dependencies and then run jekyll.
1
2
3
4
5
6
7
8
9
10
11
12
13
14
15
16
17
18
19
20
21
22
23
24
❯ source dev-setup.sh

❯ bundle
Ruby Docker Wrapper
Fetching gem metadata from https://rubygems.org/.........
Fetching concurrent-ruby 1.2.2
Fetching minitest 5.18.1
Installing minitest 5.18.1
Installing concurrent-ruby 1.2.2
...
Installing jekyll-sitemap 1.4.0
Bundle complete! 5 Gemfile dependencies, 40 gems now installed.
Use `bundle info [gemname]` to see where a bundled gem is installed.
Post-install message from html-pipeline:
-------------------------------------------------
Thank you for installing html-pipeline!
You must bundle Filter gem dependencies.
See html-pipeline README.md for more details.
https://github.com/jch/html-pipeline#dependencies
-------------------------------------------------

❯ jekyll -v
Ruby Docker Wrapper
jekyll 4.3.2
And also the Jekyll build is correctly created:
1
2
3
4
5
6
7
8
9
10
11
12
13
14
15
16
17
18
19
❯ jekyll build
Ruby Docker Wrapper
Configuration file: /app/_config.yml
            Source: /app/src
       Destination: /app/_site
 Incremental build: disabled. Enable with --incremental
      Generating...
                    done in 0.922 seconds.
 Auto-regeneration: disabled. Use --watch to enable.

❯ ls -l1 _site
about
articles
assets
index.html
robots.txt
sitemap.xml
tags
Now we just need last few bits to make Jekyll serve our website in dev environment:
1
2
3
4
5
6
7
8
9
10
11
12
13
14
15
16
17
18
19
20
21
22
23
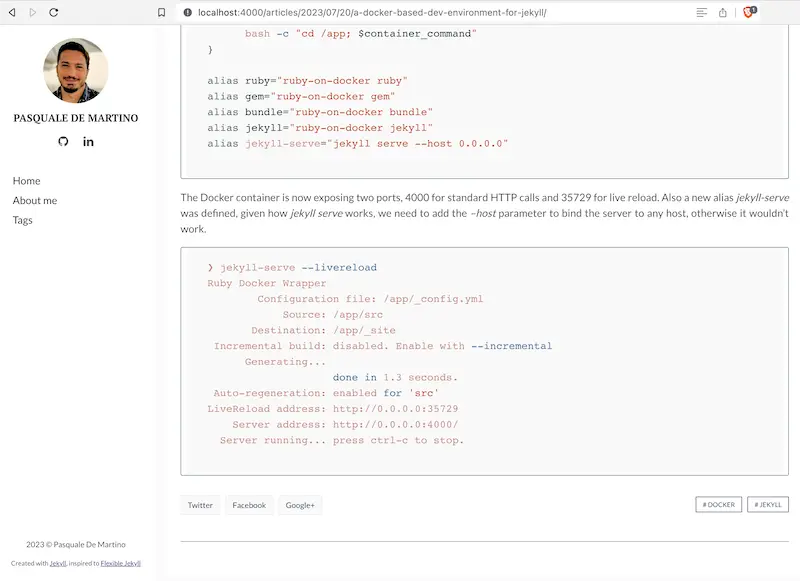
> cat dev-setup.sh
RUBY_DOCKER_IMAGE='ruby:3.2.2'
export RUBY_DOCKER_PARAMS='-p 4000:4000 -p 35729:35729'
function ruby-on-docker() {
echo "Ruby Docker Wrapper"
container_command="$@"
docker run -it \
$(echo $RUBY_DOCKER_PARAMS) \
-v ${PWD}:/app \
-v ruby-bundle:/usr/local/bundle \
$RUBY_DOCKER_IMAGE \
bash -c "cd /app; $container_command"
}
alias ruby="ruby-on-docker ruby"
alias gem="ruby-on-docker gem"
alias bundle="ruby-on-docker bundle"
alias jekyll="ruby-on-docker jekyll"
alias jekyll-serve="jekyll serve --host 0.0.0.0"
The Docker container is now exposing two ports, 4000 for standard HTTP calls and 35729 for live reload. Also a new alias jekyll-serve was defined, given how jekyll serve works, we need to add the –host parameter to bind the server to any host, otherwise it wouldn’t work.
1
2
3
4
5
6
7
8
9
10
11
12
13
❯ jekyll-serve --livereload
Ruby Docker Wrapper
	Configuration file: /app/_config.yml
            Source: /app/src
       Destination: /app/_site
 Incremental build: disabled. Enable with --incremental
      Generating...
                    done in 1.3 seconds.
 Auto-regeneration: enabled for 'src'
LiveReload address: http://0.0.0.0:35729
    Server address: http://0.0.0.0:4000/
  Server running... press ctrl-c to stop.
And, finally:
Comments powered by Disqus.